Category: Light Painting

  • The Beginners Guide to Light Painting Part 2

    If you haven’t already read it check out Part 1 of this blog which is linked here.

    So you’ve played with light painting a little bit and gotten a feel for it. Now let’s talk about the little nuances that you can do to make your images even better. A lot of this will be focused on your camera and gear more so than light painting so get your technical game on! First let’s talk about some camera settings that can be a benefit or a detriment.

    Camera Settings

    Mode – If you read the first article then you already know that you should be in Manual mode as it makes adjusting your picture easier and not have to fight with the camera.

    Image File Type – Not just in light painting but in every kind of photography shooting in RAW is encouraged because it allows you to have more information later when editing a photo. Here is an important example.

    These are a couple images I did with my friend Sammy. The image on the left is straight out of camera or SOOC and the image on the right is after editing. Now this image isn’t perfect by a long shot but I was able to recover a lot of information that I thought was lost because I shot in RAW in stead of JPEG.

    Brightness of Your Screen – At night we don’t need the back of our cameras to be super bright for our pictures. If they are super bright not only is it hard on your eyes (like light painting isn’t) but it could also make you believe you have blown out parts of your image and you might not.

    Histogram – If you don’t know how to read your histogram that’s ok! For the time being read this article to help you determine what the information is saying. I’ll make a blog post about this soon. It will help you determine if your photo is balanced or not. And of course take examples of completely black images and over exposed images to see how the histogram changes to help you understand it better.

    Image Stabilization – As awesome as image stabilization is when it comes to light painting it’s not going to be your best friend. I often need to remember to turn it off as it can fool your camera into blurring your image. if even slightly.

    White Balance – Depending on your situation you may want to adjust your white balance. Often times if I’m only shooting a single exposure and do not plan to combine it later with other photos then I keep my white balance on auto as I can easily change it in Lightroom later if I need to. However, say I’m shooting a whole bunch of images that I want to combine later in Photoshop such as light painting a vehicle of some kind. Many people will combine many into one. It can be difficult to find the right white balance for all of your photos in post if you are shooting on auto. Instead I recommend setting your white balance to a setting that you like for your exposure and keep that the same for every picture.

    Gear

    Remotes – When light painting I highly recommend having a wireless remote trigger. This is important because often times when you are light painting you won’t know exactly how long your light painting exposure is going to be ( I never do) and it allows you to trigger more light paintings quicker before having to review.

    Picture Techniques

    Focusing – When trying to light paint in almost all cases we’re doing it in low light. The way that your camera works is that if it’s set on auto focus it will only try and focus on where the light is. When we are light painting our lights go on and off and the camera will try and focus on that which will results in our picture being out of focus. In order to combat this we have two options. Our first option is to switch our camera to manual and then focus on our subject with lights on or someone illuminated the subject. Our second option is too use our auto focus to find the subject that is illuminated and then switch auto focus off as this accomplishes the same goal. Of course it’s great if you can create a marker for the subject to be so we don’t have to refocus your shot each time.

    Exposing – When you are setting up your camera to take a light painting you need to make sure you expose for the environment first and then your subject. This will allow you to get pictures that are evenly lit and not over or under exposed. This can change a low depending on the ambient light in your environment so make sure to adjust accordingly.
  • The Beginners Guide to Light Painting

    So you want to get into light painting? AWESOME. I’m so stoked for you! But like what do you need? No worries fam I got you covered.

    Let’s define what light painting is. Light painting is simply a long exposure photography where you used some kind of light source to enhance the scene. It’s similar to low light photography but we are using a light that we put into motion to manipulate the photograph. Along side this there are two major types of light painting. Those are light painting a subject and light painting your environment. In my opinion learning to light paint the environment will make your subject light painting better as often times you will include the environment in the photo, however both come with their own challenges but we will get to that another time.

    The first item we are going to want is a camera. Honestly any DSLR will do (and yes you can do this on a phone but that’s another blog post) most have the ability to change your shutter speed to Bulb mode and while this isn’t necessary it can be very useful in the future as you become more experienced.

    Secondly, you have to have a tripod. For all the light paintings I do I always have my camera on a tripod because during a long exposure your camera can’t move otherwise it becomes blurry with light streaks everywhere and you no longer have a clear picture. Of course I recommend buying a decent tripod as cheap small tripods or plastic lightweight ones can be bumped easily and ruin your exposure or can be knocked over and potentially destroy your camera. We don’t want that.

    Lastly, you need some kind of light source! This can range from a variety of things whether it’s your cell phone to car lights, to any custom light painting tool you might use. You have so many options out there that you’ll want to try everything.

    The three things I listed here are the bare minimums when it comes to light painting. I don’t what to delve to far into recommendations because I don’t want to overwhelm you. Next let’s get to the 3 major settings on your camera that your light paintings will deal with. That’s your ISO, F-Stop, and Shutter Speed. Our Exposure Triangle.

    First we have our ISO. (Located at the bottom of this card) Basically this is fake light that your camera creates in order to help you take a picture. The lower the ISO the less “grain” you’ll have in your picture but also potentially the darker it will be. ISO is mainly used to help in low light situations and higher end cameras allow for higher ISO without grain thus allowing for more flexibility. Thankfully with most light paintings you’ll probably be doing when starting out you can keep a low ISO and be just fine. The only times you’ll really want to increase your ISO realistically is whether you have a weak light source and want to make sure you can expose your subject or environment in the right amount of time or if you want to catch the stars if shooting outside when light painting.

    Note: On most cameras Noise Reduction or NR is turned on, this is to help remove grain in low light situations if your ISO is high. When this is activated on your camera it will take longer to process the image and because we are shooting at a low ISO I recommend turning it off as it’s not really necessary.

    Next up we have our F-Stop or Aperture.

    There is a lot that you can affect with this so we will go one piece at a time. This is in at the top of the chart and will be our reference. Our aperture is an iris that opens or closes and lets in more light or less light. the higher the number the less light is let in the camera and the lower the number the more light is let in to the camera. In tandem with this this when we have a higher number the more in focus the background, foreground and subject (if you have one) will and the lower the number the less in focus the all of the foreground, background and or subject will be. When it comes to light painting your aperture will be your biggest variable in not only the focus of your image but also how much your image is exposed with the light you are using. With a weaker light you will want a lower F-stop and with a stronger light you will want a higher F-stop. Of course the brightness of your light could also be changed instead of changing your F-stop but that all depends on the situation so play with your option and see what works best for you! This can apply to both subject and environment light painting

    Lastly we have our shutter speed, which is in the middle of the chart. This mainly applies with subject light painting. When light painting a subject you want to make sure that subject is as still as possible other wise it could potentially become blurry. When you look at the chart on the right hand side you can see that the shutter speed is set to 1/2 second and shows a very blurry person moving. That’s because in order to take the picture it took the camera a whole 1/2 a second to close the shutter and take the image. Since the camera took the image much slower than the person was moving it became blurry. In light painting we are often dealing with very slow shutter speeds which can range from 2 seconds to half and hour. It all depends on what you are trying to create. In most DSLR’s if you don’t have a remote (which we will talk about in a later blog post) the longest you can go is 30 seconds. For the time being set your exposure anywhere between 2 seconds to 30 seconds and see what you can come up with whether it’s with a subject, the environment, or the light painting itself.

    Now that we have a basic understanding of the tools needed and how your camera will relate in it’s most basic functions to light paint with we have a few extra tips to make your first attempt more successful.

    1. Wear black clothing – Black absorbs light and white reflects it. Unless you want to show up in your photo wearing black will help hide your from the camera and any potential light spill that may fall onto you. However this isn’t perfect but can only help prevent exposing you.

    2. Constant movement – Don’t stand still in one spot for too long. If you do it doesn’t matter how much black clothing you are wearing you will eventually show up or at the very least a black ghostly apparition of you. Which most likely isn’t what you are going for. This can be effected for better or worse with your F-stop too.

    3. Your Cell Phone – Don’t have any tools to light paint with? Trying just using the flashlight on your cell phone! You can create awesome lines with just your cell phone and make a killer light painting all in themselves. This is a great tool to start with and master in the beginning.

    4. Done Is Better Than Perfect – With anything in life you’re not gonna nail it your first time. This is especially true in light painting. Learn to enjoy just seeing what you can create and see what the possibilities are. More often then not you’ll create something that is amazing while just having fun and it will have you keep coming back to try more and more ideas.

    Just to be on the safe side I’m going to do a quick run down on how light painting works. First set up your camera on a tripod and set your desired settings. You could do your lowest f-stop like 2.8 or 3.5, your ISO at 200 your shutter speed on 10 seconds. Whether you are using a model or just yourself it doesn’t matter! As soon as you press the shutter run out in front of your camera and wave some lights around to create your first light painting.

    That’s it! I know that was A LOT of information to learn just the basics of light painting, but light painting is best experienced by just doing it. Before too long you’ll have a much stronger grasp on what it entails and how you can manipulate your camera to make some of the coolest light paintings yet!

  • Hacking Your Photos With Light Painting Blades

    If you would rather watch a video watch the one above!

    The first image that we are going to create using light painting blades is making a wormhole or crown of sorts with our blade, behind our model. I like to use blades from lightpaintingbrushes.com (use the code RKW20 for 10% off) don’t forget to get a universal connector! Like with all light painting images make sure you have a decently dark space and a flashlight that can do  strobe for this first image. Also it’s important to note that you have your camera focused first and then keep it on manual for this to work. Otherwise your picture will be blurry. You may light your model with flash or handheld up to you.

    In your dark room stand behind your model and start with the blade pointed down behind your models head so that it is hidden form the camera. Start your exposure whether it’s timed or wireless remote and rotate the blade like a clock around her head to the beginning point. Then if you want to make another bigger crown or wormhole then drop the blade farther down from where you started and then making a bigger clock circle. If you would like a visual watch here. Don’t forget to use flash at the end (or beginning) of your exposure or just light your model up with a flashlight.

    To make our second image (as seen above) we take our blade again but with no strobe. Then we apply some stingy gels that you can get off of Amazon, and you hold the gels against the blade with your pointer and middle fingers on the back of the blade and your thumb on the top.

    Then once you have a comfortable grip, turn out the lights, start your exposure and wave your blade around! You can see an example here. Of course end with flash or lighting our model with a flashlight.

    It’s important to note you can also do this without gels but I love having multiple colors and this is an easy way to do it in one go.

    To stay up to date with more tutorials or for my light painting adventures subscribe! It would mean a lot to me! I promise no spam. It doesn’t even taste good.

  • Drone Light Paint Any Image!

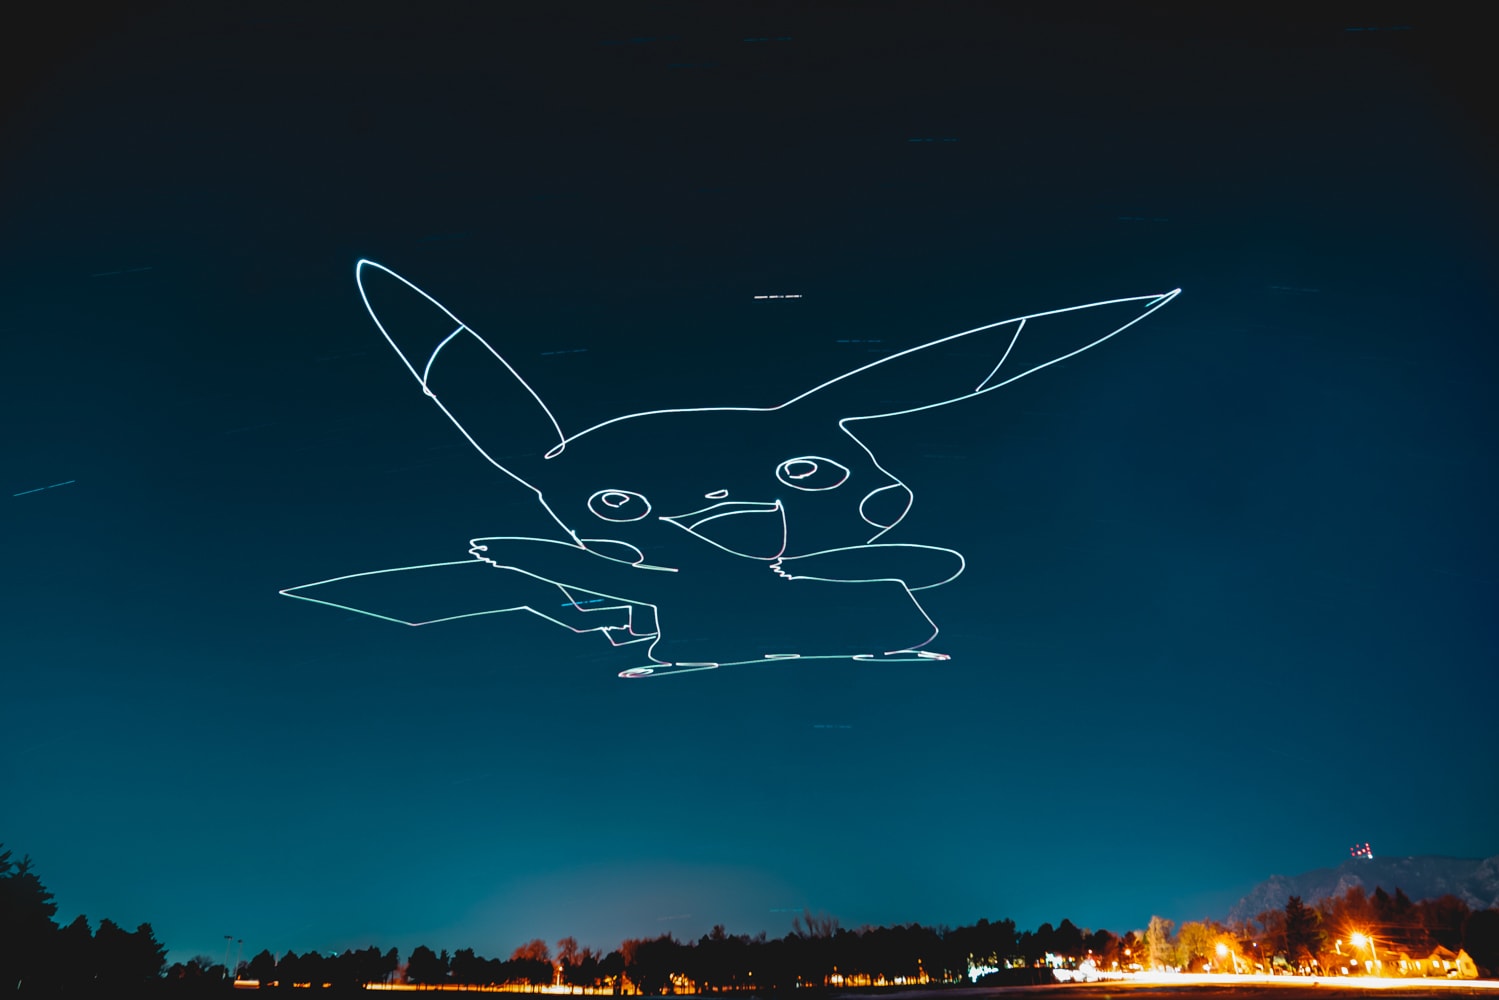
    A few months ago I was inspired to try and see what shapes I could create while attaching a Lumecube to my drone. I’d seen people like Phill Fisher do shapes in the sky manually and was extremely impressed but didn’t have the time to learn how to fly shapes manually. So instead I scoured the net on drone apps that could make things like this possible, and this was my discovery.

    When creating these drone patterns in the sky I use the program Litchi that you can buy for 25 bucks from the app store on Android or Apple. You can use other apps such as Red Way Point or any app that can place waypoints to do this same thing, but I find Litchi has more finesse. The reason it does is because it can connect to Google Earth.

    Before I go any farther I want to state that you should always know if you are allowed to fly in the area you desire. Use apps like Airmap and B4UFLY to check, so you don’t get in trouble. Even if you can fly there make sure you are always aware of your surroundings for helicopters or anything else in the air. They take priority over you. Also if you want to use this technique to make money you will need a Part 107A, and as far as I know a night waiver.

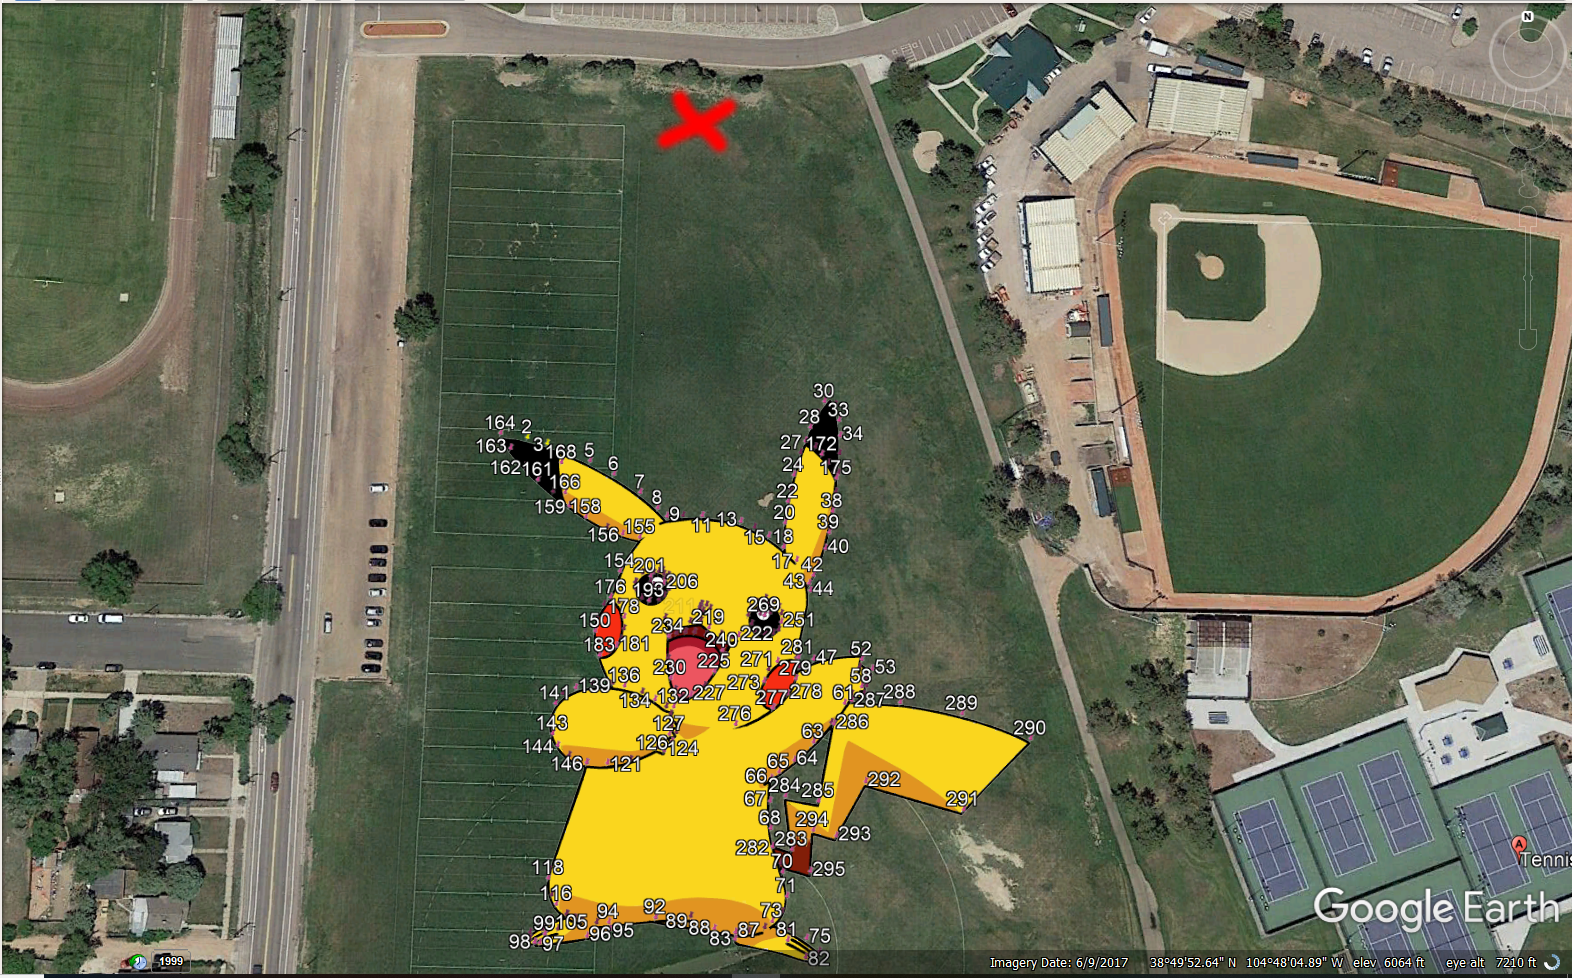
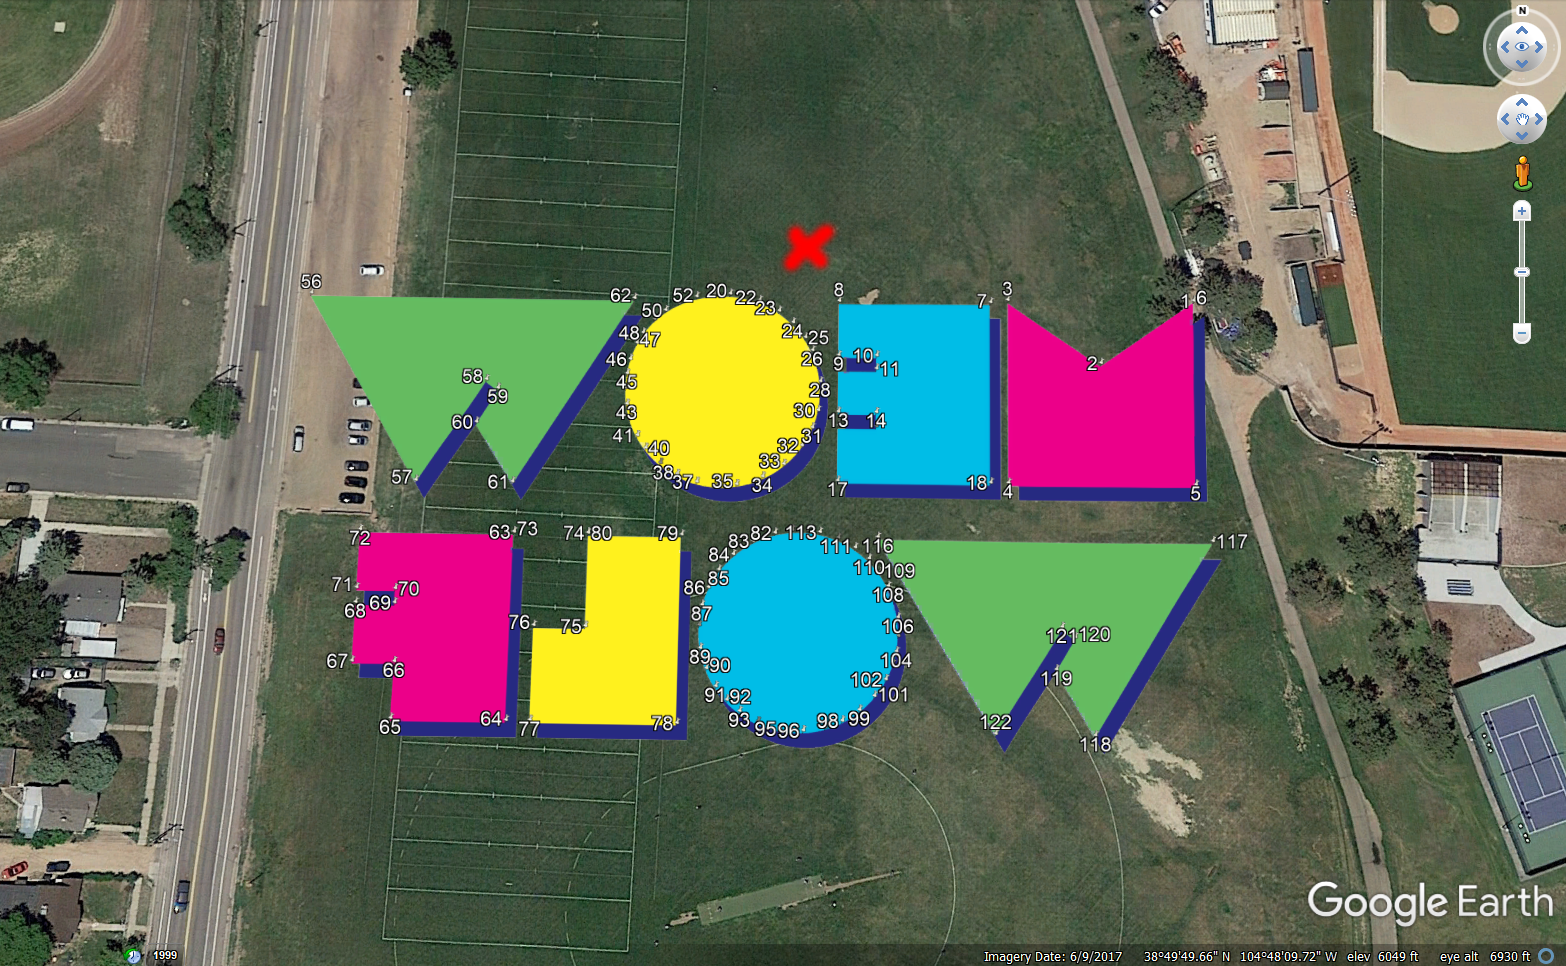
    Google Earth allows to you get really detailed on where you want to fly, and the best part is you can put in image overlays. This more or less allows you to trace an image you put into Google Earth with your drone if you have enough patience.

    First you need to get a drone and a bright light you can attach to it or if you have a Mavic Pro 2 for example there are LED’s built in. Then you need to find a big open area you can fly in that safe and where you won’t be bothered. A tried and true spot is around 900 ft by 600 ft. This is also important because waypoints can’t be too close or the drone won’t fly the pattern. (This is only if you are working in a horizontal plane)  Once you have those it’s time to program. I recommend doing this at home or somewhere comfortable as it takes awhile.

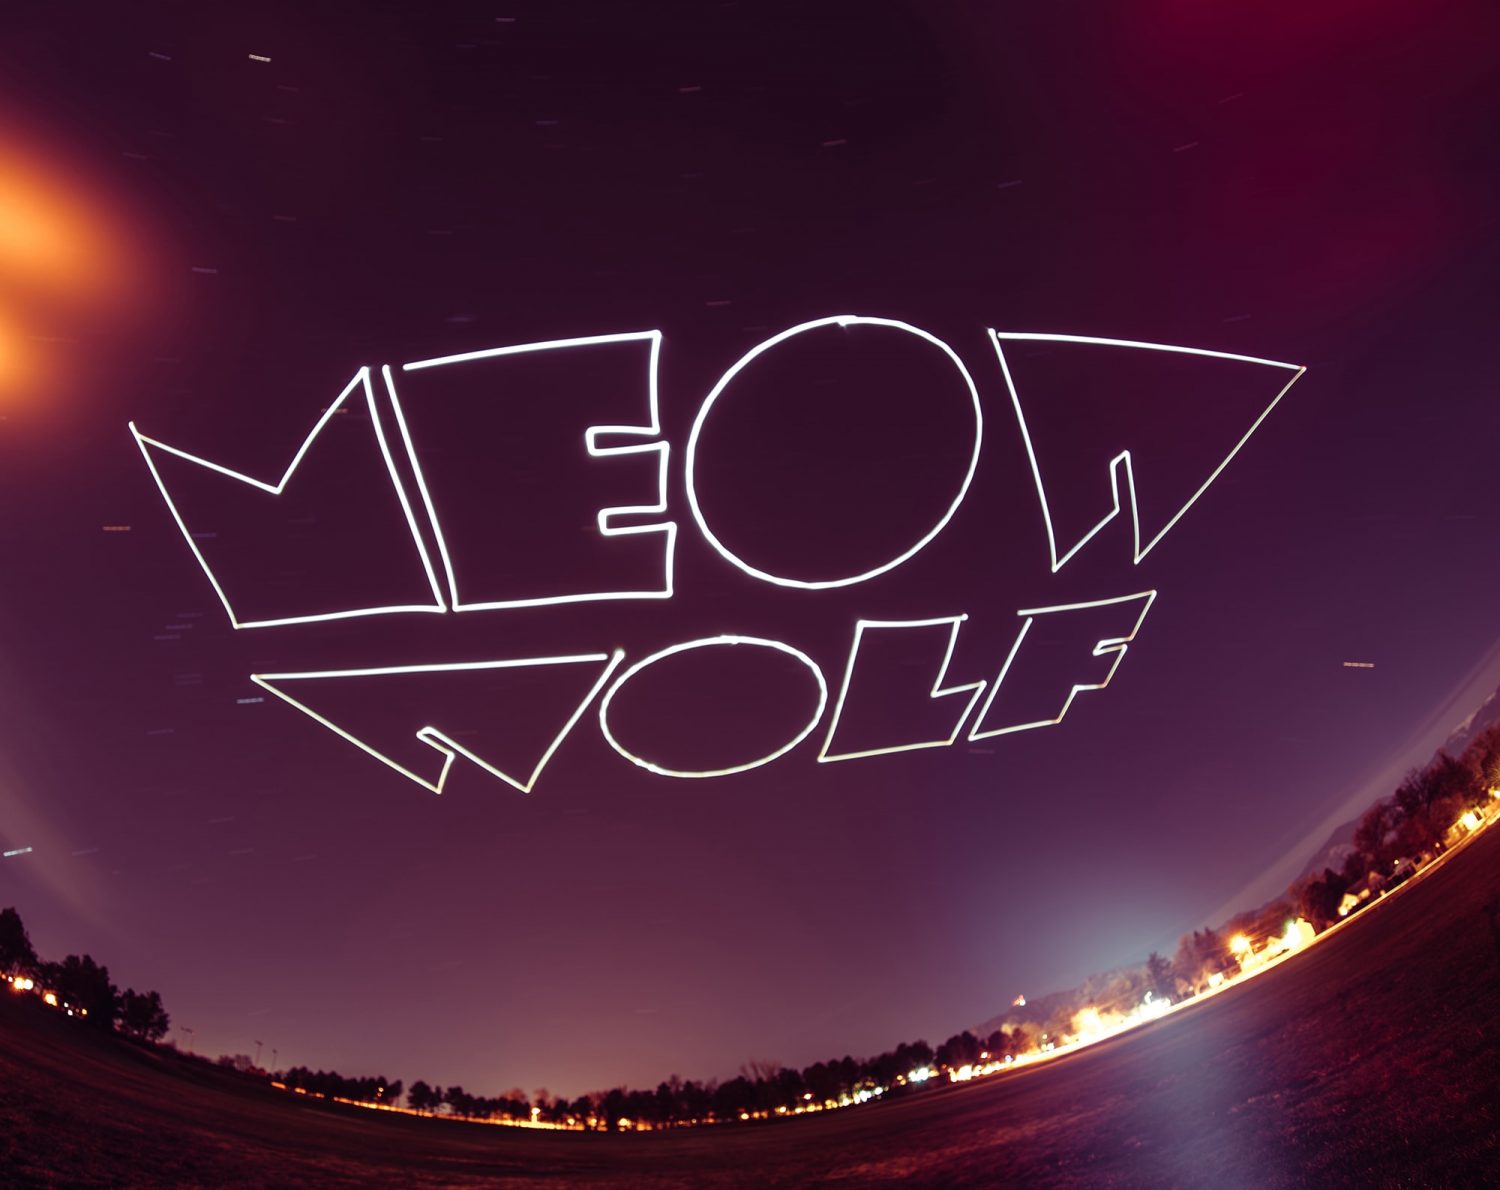
    When programming you need to know where you will be setting up your camera. That’s important because when taking the long exposure you have to program the image upside down. In the image below you’ll see an X where my camera was and where I am in relation to Pikachu. If you are doing words then they need to be upside down and backwards, here is an example of the Meow Wolf one I did as well.

    Screenshot-306.png

    Screenshot-307.png

    pikachu-first-min.jpg

    DSC4897-min-e1549224100217.jpg

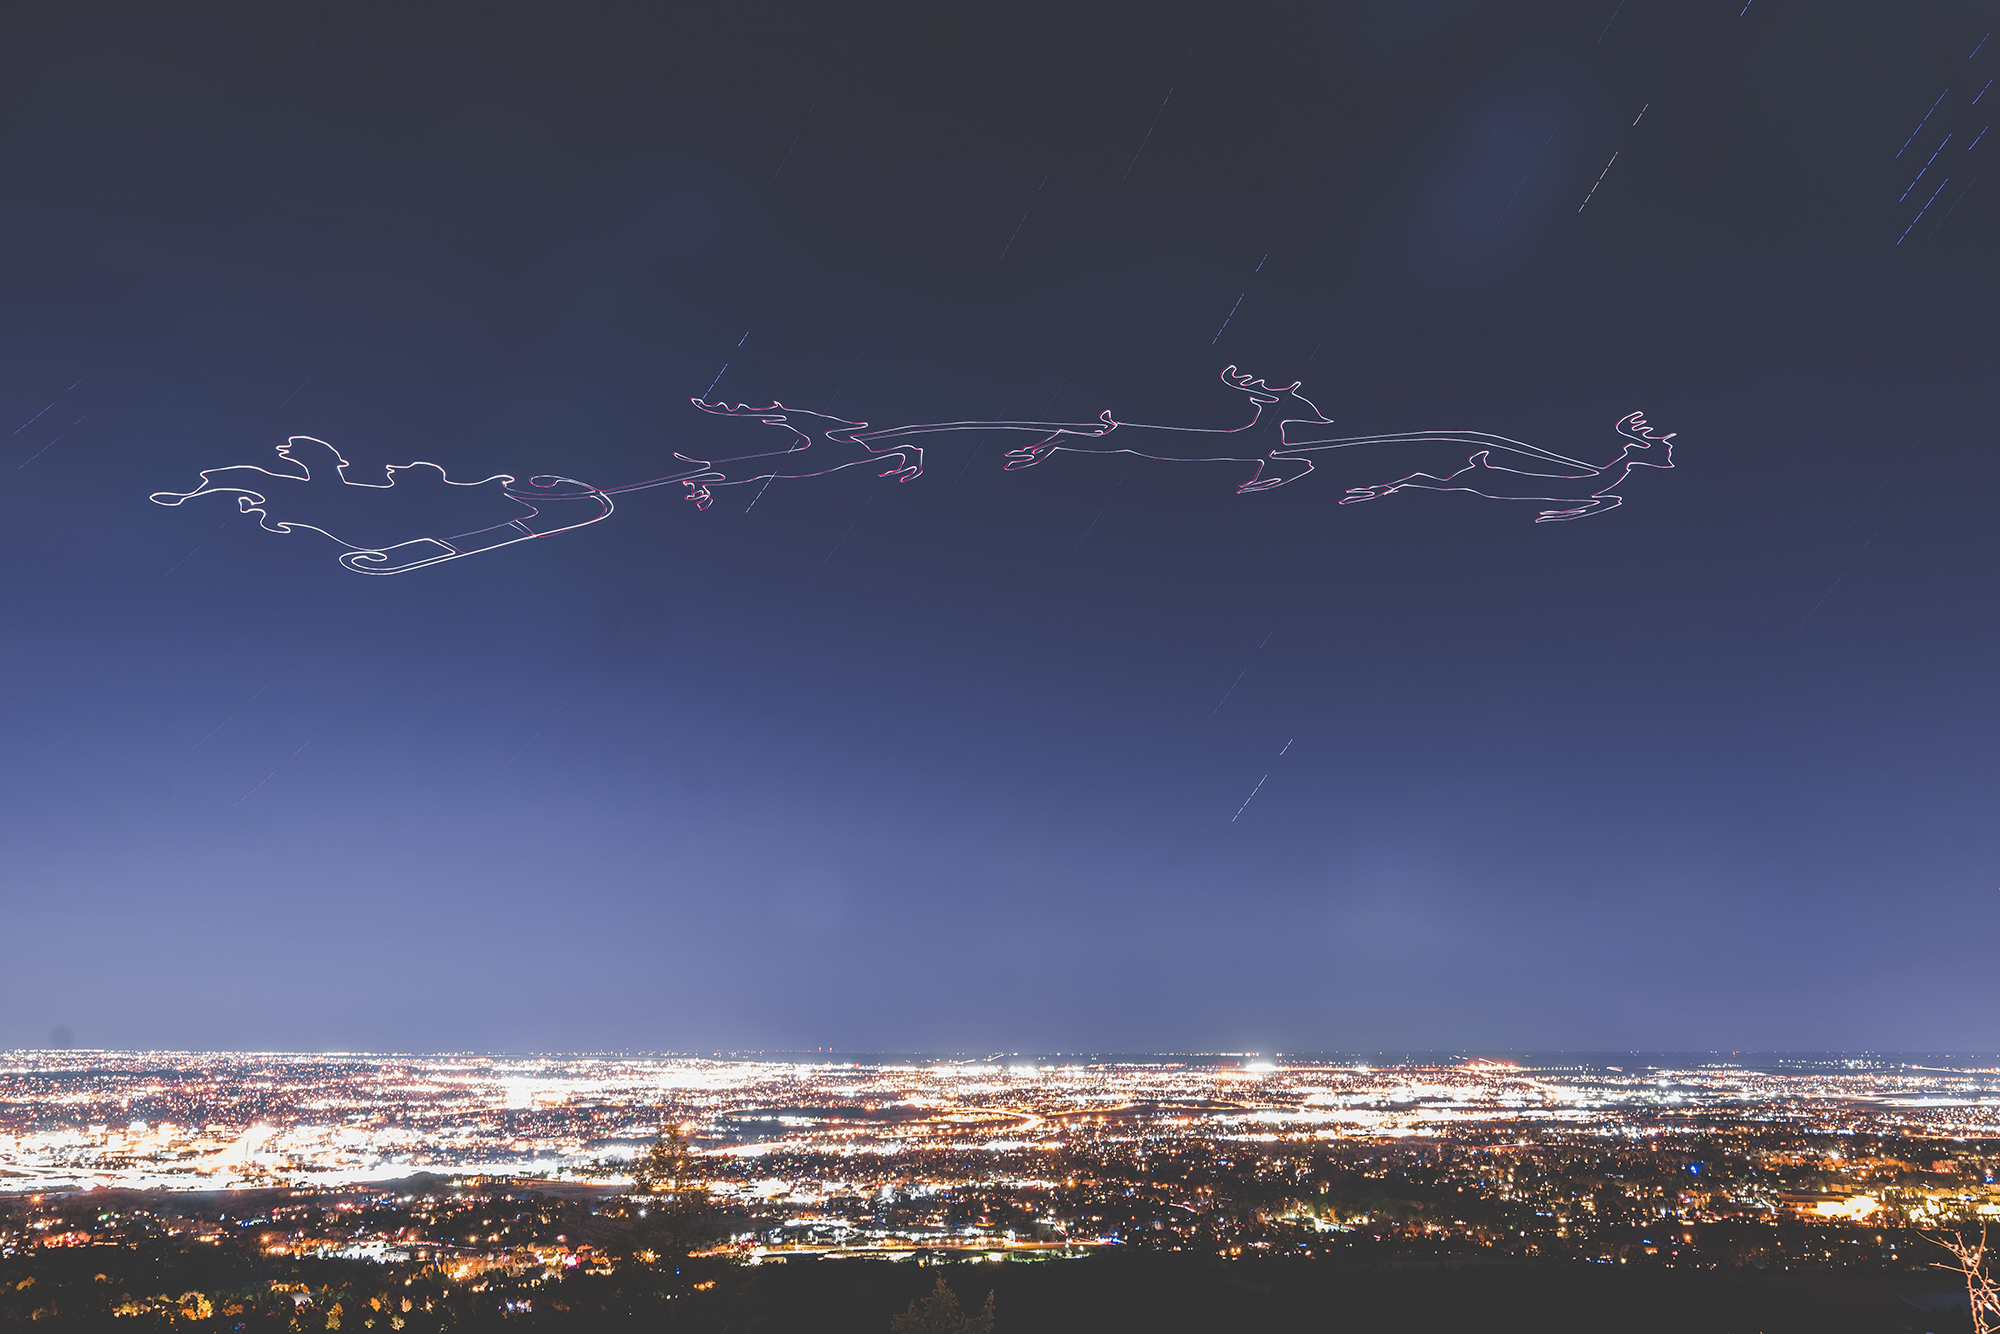
    Then once you have your overlay set (you may need to make adjustments and resize it to fit your open space you’re using) you can start putting in the way points. Your overlay at this point should be stapled to the ground, I find this easier for creating. I prefer manually putting in the waypoints one at a time instead of drawing lines for them because it lets me be super detailed. A shape can consist of a few way points or hundreds to thousands. My current record when writing this article is 633 for Santa and his reindeer but you can definitely have much more. It is worth noting that doing these shapes may take more than one drone battery (as Santa did) especially if you are using a small drone that doesn’t like the extra weight of a LumeCube.

    santacolosprings-min.jpg

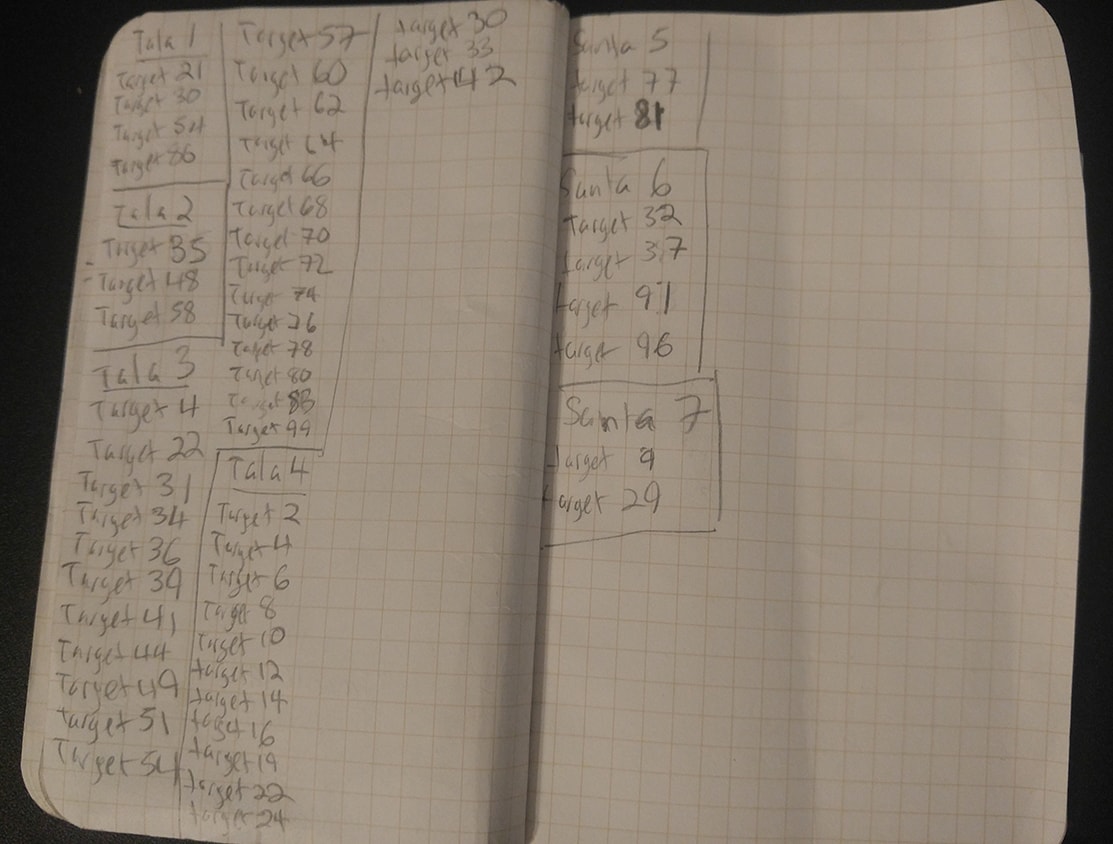
    As you are creating your waypoints I recommend you do them in sets of 99 and put each set in a folder and label it. The reason for this is because Litchi only allows up to 99 waypoints for each path you program into it. So every time you complete one you’ll need to upload the next path. When this happens I recommend covering your lens so you don’t get any bright spots on your photo.

    If you are creating a shape that has any gaps in it like Pikachu then you’ll need to know either when to cover and uncover your lens or you can change your POI of your drone (as I attach my light to the back) and the light will turn so your camera can’t see it. Though this depends on where your light or lights are attached. Here is an example of my little book of when I need to cover my lens, for one of my more complicated paths.

    20190203_125458-min.jpg

    Once your shape is created you need to take each set of 99 and export them as KML files. This is what Litchi uses to read the paths you’ve created. You can import them onto the Litchi online Mission Hub program. Once imported it’s important that you save the file and then try and run it on your phone with the Litchi app. If it comes back with the error saying that it can’t connect to GPS then your waypoints are far enough apart that will allow the drone to fly unhindered. However sometimes it may come back and say that two points are too close together. So then you’ll have to go back to Google Earth and fix that and reexport the KML file and try again until you don’t get these errors.

    Once you have all of your paths working then you need to go and make sure you change the altitude, as when we started with the overlay we had it stapled to the ground. I like to use around 200ft or 60m. This is because I’m working on a horizontal plane for the most part and if I go much lower than that I might lose the light depending on how big my shape is. (If you attach your light a different way or have a different light source this may be different for you if using this method)

    Another important aspect to this height is because we are working on a horizontal plane depending on the camera lens you are using which would change your location for where you are shooting your long exposure and it might squish your light painting so that’s something to always keep in mind.

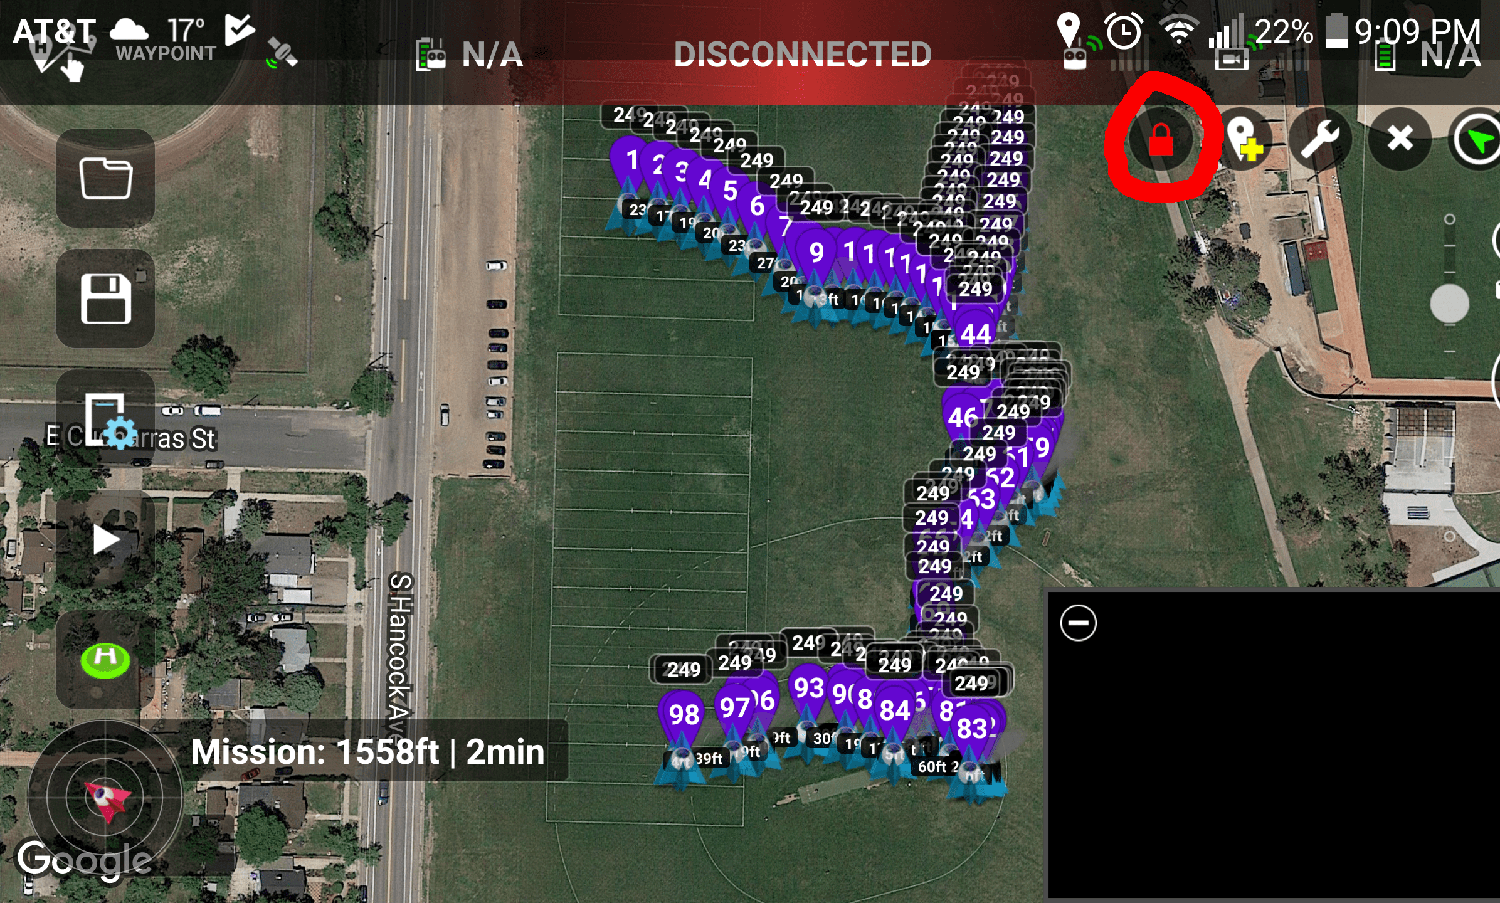
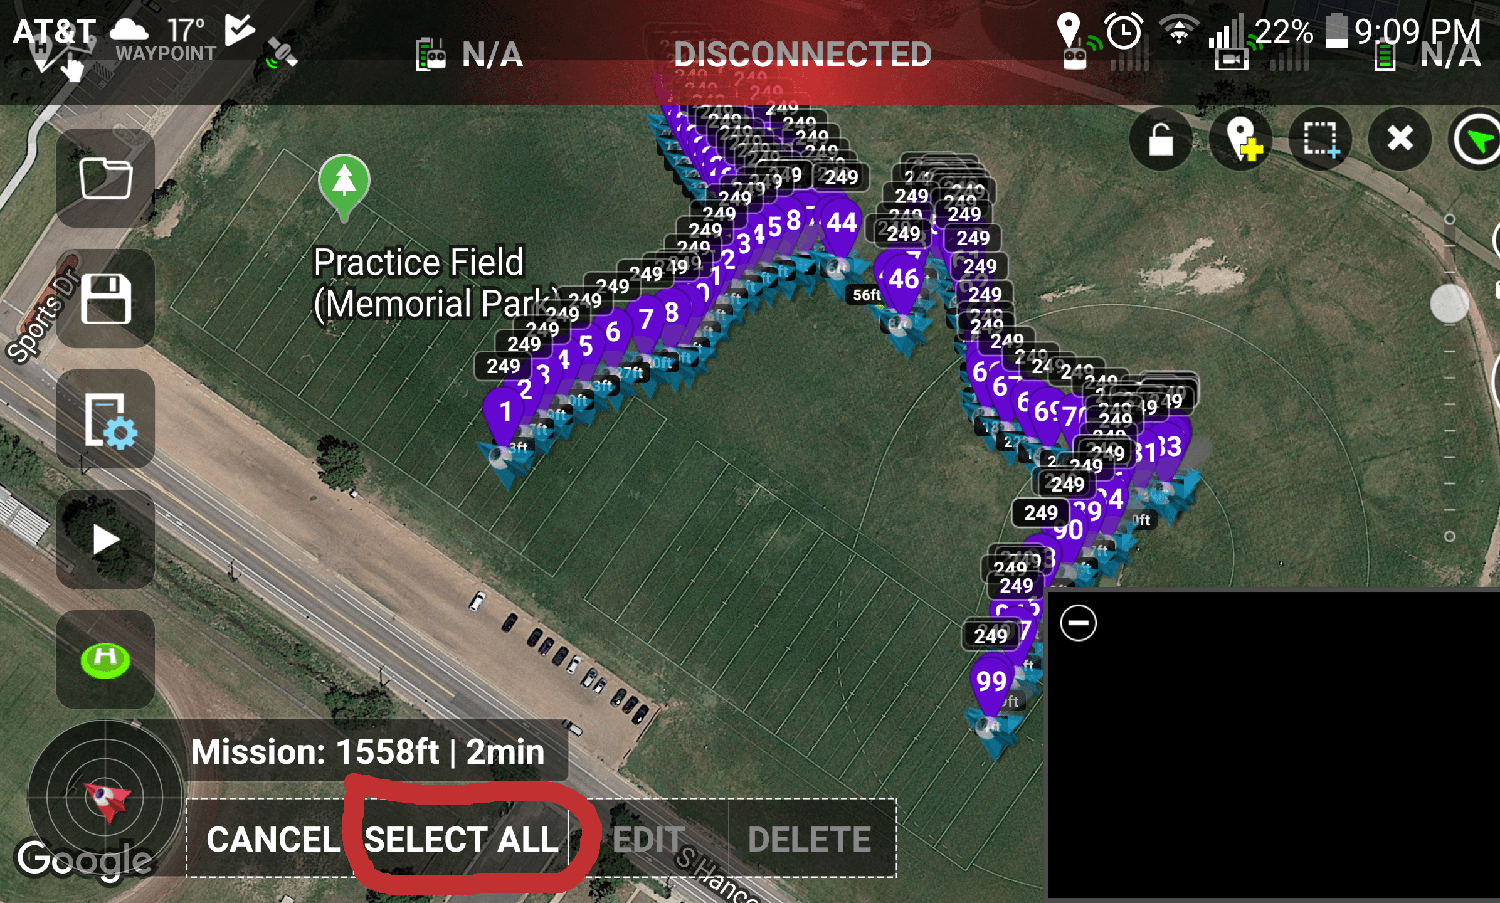
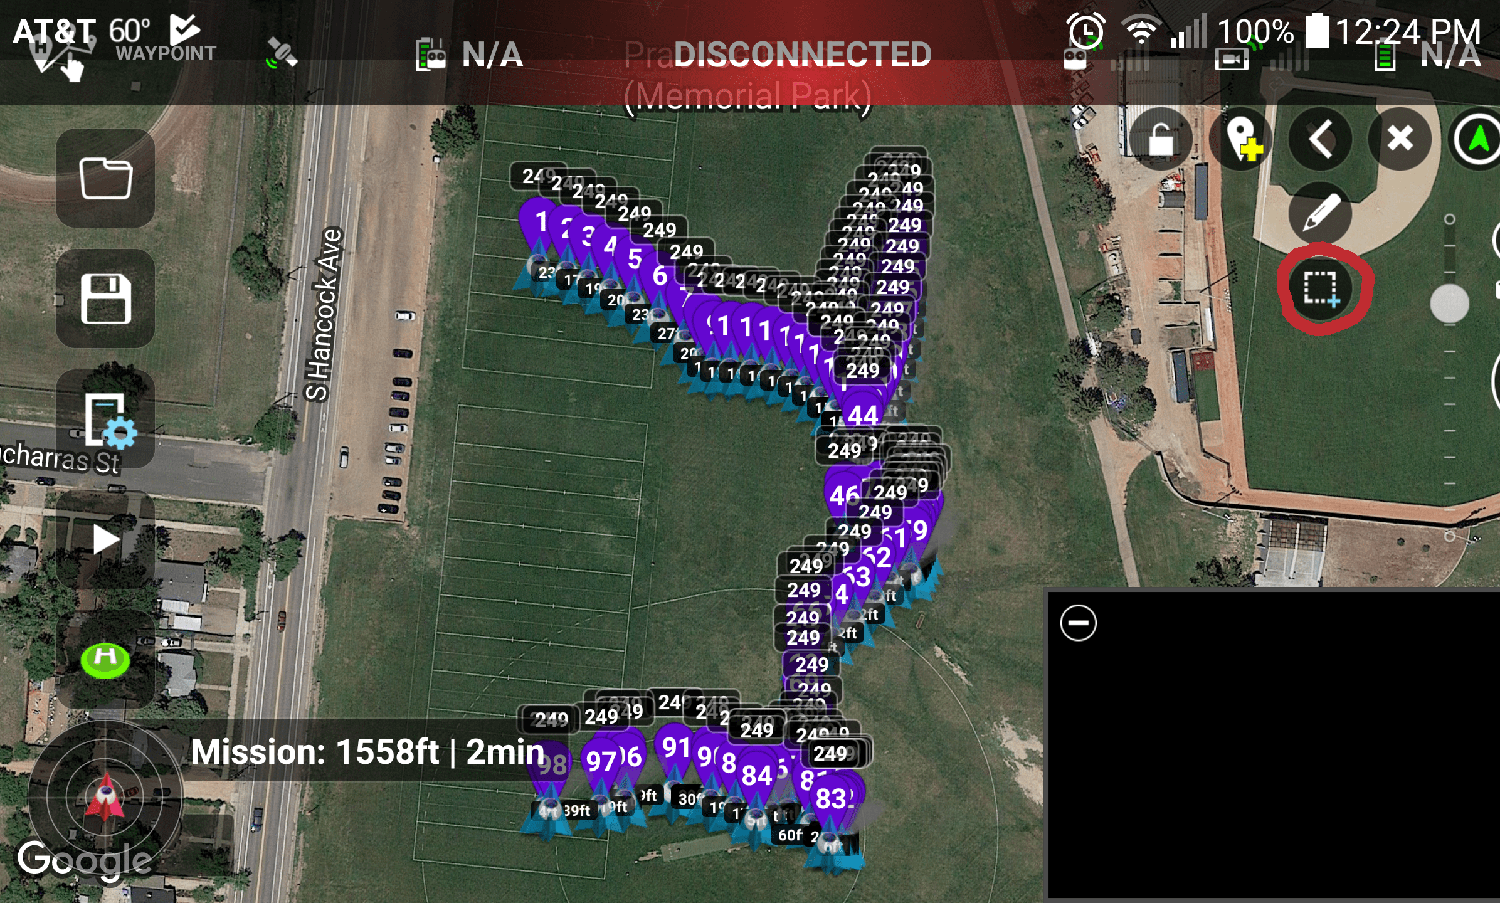
    You change this with the Litchi app on your phone. First load your mission then unlock it with the little lock icon. Once that is done click on the wrench icon then the icon of the dashed square with a plus. A new menu will pop up, hit “select all” and “edit” and adjust the altitude relative to home (which is the ground) and hit ok. You should see the numbers change above the waypoints, make sure to do this with each mission if you have more than 99 waypoints. Also keep in mind your drone heading and where the light will be, in general if using a Lumecube taped to the back of the drone your heading will be the opposite direction your facing taking the photo. Below are some screen shots of each.

    Capture_2019-01-22-21-09-09-min.png
    Capture_2019-01-22-21-09-25-min.png
    Capture_2019-02-03-12-25-00-min.png

    One more thing before you go outside to do this is to set your mph/kph. When doing detailed shapes I like to stay between 7-11 mph or 7-17 kph. This is because though you may have a way point your drone may over shoot and need to backtrack before going to the net point. This helps mitigate that.  On top of that I prefer to go into my settings in the Mission Hub of Litchi  and changed the path to Curved Turns and set the default to 0. That way my drone will fly through each point.

    Ok so I know that was A LOT, but now it’s time to go and fly! If using a wide lens (like a 12mm) you can be fairly close to your pattern if you shoot up at 45 degrees, otherwise you may need some distance depending on your composition and lens choice. I never know exactly where I’m going to set up so I generally create a test mission that does a rectangle of where the picture will take place and make sure that my composition is correct. Then I’ll replace the battery of my drone and create my picture! When the drone flies the pattern I never watch it. Instead I watch my phone and look for the correct number to cover the lens and then uncover then that number has passed. Here is an example of Eevee on video sped up from 15 minutes to 40 seconds.

  • Top Down Drone Lightpainting

    So there are a couple different ways to use drones to lightpaint. Some people will attach Lumecubes to their drone and paint an environment with them or will fly a drone around the sky or an object and have the drones lights creating images in the sky. However there is another way to use them that isn’t widely used yet. That is using the drones camera to capture light painting from above.

    Drones are becoming more and more popular these days and it’s not too expensive to buy one and play with it’s possibilities.

    Important Note

    Always be aware of your surroundings when flying a drone and make sure that the area you are in allows drones in it. This includes following FAA regulations and noting the current airspace you are in. With Top Down Drone Lightpainting this generally shouldn’t be an issue but you should be aware.

    End Note

    In order to do Top Down Drone Lightpainting I recommend having an assistant to get the drone in the right spot and monitor your position to make sure you are center, and focused as well as you can be. Or you can focus it yourself and just have them press the shutter if you’re more comfortable.

    Let’s talk about the pros and cons of shooting with the DJI Mavic Pro:

    Pros:

    • Tripod mode (this helps keeps the drone as steady as it can be) it also helps to make minute corrections to better align your picture

    • Unique Perspective

    • Creates new shapes and possibilities

    Cons:

    • Need an assistant

    • Most drones don’t have a controllable aperture

    • Shutter can only stay open for 8 seconds max

    • Pictures aren’t as clear as they could be because of drone movement

    • If there is any wind at all it will affect your picture so you will only get it so clear

    Ok so like how do you do this? I’ll do my best to break it down.

    1. Find a spot that it’s ok to fly drones and you hopefully won’t get in trouble as you aren’t supposed to fly drones at night. Fly this drone up to 30-50 ft.

    2. Have your model (if you want to use one) lay on the ground and center the drone on top of her about 30-50ft up in the air.

    3. Focus on your subject or the ground by zooming in with your drone and doing your best to get a clear shot

    4. Now take your tube or blades or whatever you want to use and get ready to lightpaint. Your drone operator will have to count down for you when you need to start painting as you only have 8 seconds if not less!

    I personally like to use models for this type of light painting but you totally don’t have to if you just want fun shapes. I find models just enhance the picture and provide interest.

    When making shapes you have to think a little differently in how they are created as you are using a different plane of perspective. Don’t be afraid to use your space! Go up and down and all around and see what you can do. I find tubes or tube like objects work best (at least so far) so that’s what I would recommend.

    The most important thing with this style is that the sky is (literally?) the limit! Or maybe your battery life. There is so much you can do with perspective it’s bonkers. So go wild!

    You can find even more of these on my instagram: @lightnlense – https://www.instagram.com/lightnlense/


    Tutorial

    Russell Klimas
    August 16, 2018
    dji, top down, mavic, mavic pro, lightpainting, drone, down, top

  • Painting With Fire

    So we’ve used flashlights but what about the most primitive light source fire? Well you’re in luck because we can do that too!

    * WARNING *

    I must warn you that fire is dangerous and I recommend not only doing this with multiple people in case it gets out of hand but also a fire extinguisher for safety. Be sure to check your area of living if there is a fire ban going on or not and/or what the fire danger is everyday. The last thing I want to happen to you is for you to start a wildfire by accident. I take no responsibility for any damage that might occur to you, other people, animals, or property from anything you learn in this blog post.

    * END WARNING *

    So how do I firepaint? It’s pretty simple when you get down to it so let’s go!

    The things you’ll need:

    • A 4ft wooden dowel from Home Depot (Things can vary in size but I get once that are at least half and inch wide)

    • 100% Cotton t-shirts (Other materials that burn will have fumes that could be harmful)

    • A hardcore stapler of some kind. I use one that you can whack into the dowel. A staple gun works too.

    • Lighter Fluid

    • Scissors

    First get your wooden dowel from Home Depot or Lowe’s or whatever hardware store you have in your area mine look like the ones below. I like the ones with yellow on the bottom as it provides a better grip overall, they are about half an inch thick. Then take your 100% cotton t-shirt (They can be any color or have print on them it doesn’t matter) and cut the t-shirt in half.  You save shirts and get the same use out of them that way.

    Then roll the half t-shirt around the stick until it envelopes the upper half of the stick completely. Take out your staple whacker/gun and whack those staples in there! Once you are confident the staples are in there well enough, you’ve created your own firestick!

    Time to go fire painting!

    *insert Montage music here for firepainting*

    Now that it’s dark enough for you to fire paint a couple things you need to be sure to do.

    • Find an area where it’s difficult to catch other things on fire that aren’t your fire stick. This isn’t necessary but HIGHLY recommended. Especially if you’re a beginner. So any place that’s completely pavement or dirt and in a contained area is great.

    • Have a fire extinguisher close by and make sure it’s primed and ready at a moments notice. I recommend getting a refillable fire extinguisher instead of a single use one. As it’s better for the environment and you’ll save money in the long run.

    • Lighter fluid can be picked up from pretty much any hardware store or supermarket. When using the lighter fluid make sure you apply it to the stick away from the general shooting area so if any fragments of fire come off they don’t catch on the lighter fluid on the ground.

    Once you have your camera set up take firestick and lighter fluid and apply them away from your shooting area. You don’t need a lot of lighter fluid for it to work just enough to help catch the shirt on fire. It’s like one quick pass for about a 1 second on the stick is more than enough.

    After the lighter fluid has been applied set the lighter fluid away from your shooting area also. The last thing we want is to catch a big bottle of lighter fluid on fire. That would be no bueno for everyone.

    If you are using a model to fire paint with get in position behind them. The minimum safe distance is about a foot and a half behind your model. You don’t want them to catch fire too.

    REMEMBER, fire travels upward so if you point your firestick down it will travel upwards on the stick towards your hand so be careful! Also you can’t turn fire off and back on so once it’s started be quick with your shapes!

    When shooting with fire I suggest having a low ISO and a high f-stop of about F11. Only the first couple of shapes you do will come out bright enough on F11 after that the brilliance of the flame diminishes. I then recommend either having a friend change the f-stop to as low as it can go like F 2.8 or you can run over to your camera with your firestick burning and do it yourself.

    And that’s it! You are now painting with fire and your imagination! Again please be careful as fire is a volatile substance and be treated with respect and don’t play with fire if your state is in fire danger or a fire ban it’s illegal!

    Another person to check out in firepainting is my boi Zach Alan who gave me my starting point with this style!


    Tutorial

    Russell Klimas
    July 8, 2018
    fire, fire painting, danger, warning

  • Creating Wings With Light

    When starting a light painting with the feather blade make sure you start your shutter and then turn on the flashlight onto strobe behind your model. If you haven’t already done so insert the flashlight into the feather blade with the universal connector and move back and forth from your models back creating as many trails of the feather tool as you like. Once you’ve finished behind your models back turn off the flashlight and click the shutter once more. Congrats! You’ve now just made some wings with light! There are multiple different wings you can make so get creative!

    The first style with the tubes is created using a t8 or 12 tube with one flashlight in it. Start your shutter. Then pick either a shoulder or hip to start from, turn on your flashlight, and make a swipe up or down to create the wing on that side. Next, turn off your flashlight. The reason we do this is so we can have separation for the wings. Then start again, turning the flashlight on, at the opposite hip or shoulder and swipe up to down depending on how you want to make the other wing. Once finished turn off the flashlight and click your shutter to capture the light painting. It can take quite a lot of practice to get decent wings. I know I still need work on them!


    Tutorial

    Russell Klimas
    April 12, 2018
    flashlight, lightpainting, light painting, wings

  • Light Painting Rainbows

    In order to obtain these fantastic rainbows we use a specific material on the outside of our tubes. For this specific kind of rainbow we use this 2-way reflective metallic spandex.  When you order it you get a pretty decent amount so it will allow you to create multiple tubes whether they be on t12 tubes or t8’s.

    Personally I use a t12 tube and use scotch tape to attach the material to the tube. However, my boy Zach Alan put’s it on a t8 tube and put’s that t8 inside of a t12. His way does allow for less flopping of the material and keeps it safer.

    In my personal opinion the fantastic thing about the rainbow material is that it can give a wide variety of effects depending on how you use it. For me I generally shoot in complete darkness using two flashlights with a low ISO and a high f-stop of 8 or 9 to get my desired effect. Zach however get’s different colors when he’s shot during blue hour and it turns out brilliantly. I don’t have his specs but here are a couple of his pictures on his instagram.

    When shooting with this material in my experience SOOC (straight out of camera) you can see some slight colors from the material but not to the extent that you see in pictures after they’ve been edited in Lightroom or some other editing program. The biggest thing when it comes to these pictures is to make sure to boost the saturation and vibrance to really get the colors to pop out.

    On top of this when it comes to the rainbow tube if it comes to other shapes other than a circle and straight lines I don’t find that it performs that well. It’s something that I need to continue to experiment with but that’s what makes light painting so grand! Thanks for reading!


    Russell Klimas
    April 5, 2018